Showing posts with label photography. Show all posts
Showing posts with label photography. Show all posts
Thursday, February 6, 2020
Sunday, January 26, 2020
Tuesday, August 18, 2015
How NOT To Take A Headshot Part Deux
Okay, I have to pick on my husband once again.
He is very good at many, many things, and he's not that bad with operating a camera, it is just that he does not have what you'd call "the eye" for it. Usually, I can take one of his images and crop it and make it AWESOME...but when it comes to portraits...neither he nor my younger son, Ross, have a natural talent.
If you read my previous post, How NOT to Take A Headshot, then you saw the images Ross took of his Dad. If you haven't read it, scroll down a few blog posts or just click on the link.
Now, both of these photos needed to have a professional look to them for the purposes of which they were to be used.
I am not a professional photographer. I am more of a hobbyist, but I do read about how to improve my shots. That, and my husband has gifted me some very good lens and flashes for my Nikon Cameras.
I also have a back drop which they set up and lighting which they did NOT set up.
So first, here is the best of the portraits my husband took of Ross who has completed all his requirements for Eagle Scout and needs a portrait.

The only lighting was coming from the ceiling fixture.
This is my unedited version.

And my edited version:

I cropped it in a bit, and darkened the background because there was a slight shadow cast by the flash and I toned down some of the reds in his skin tones and ears.
In my version, he is shaven, has a new haircut, and a new but a bit too large BSA shirt his Dad bought, complete will all his latest patches.
Unfortunately, the color of the shirt does wash out his skin tones.
Also, Ross has a prominent chin like his Dad's and a 5 o"clock shadow immediately after he shaves, so I toned down the high lights and stubble on his chin.
It's all about the eyes and I did bump up the sharpness just a touch.
I turned his right shoulder towards me for two reasons. I feel it showed off his patches and it helped keep the oversize shirt from looking as large.
I don't typically follow the rule of thirds on portraits to the exact measurement because I don't like a lot of empty space above the head. In fact, some of my favorite portraits skim off just a bit of the top of the hairline because it makes the hair appear fuller.
For example:


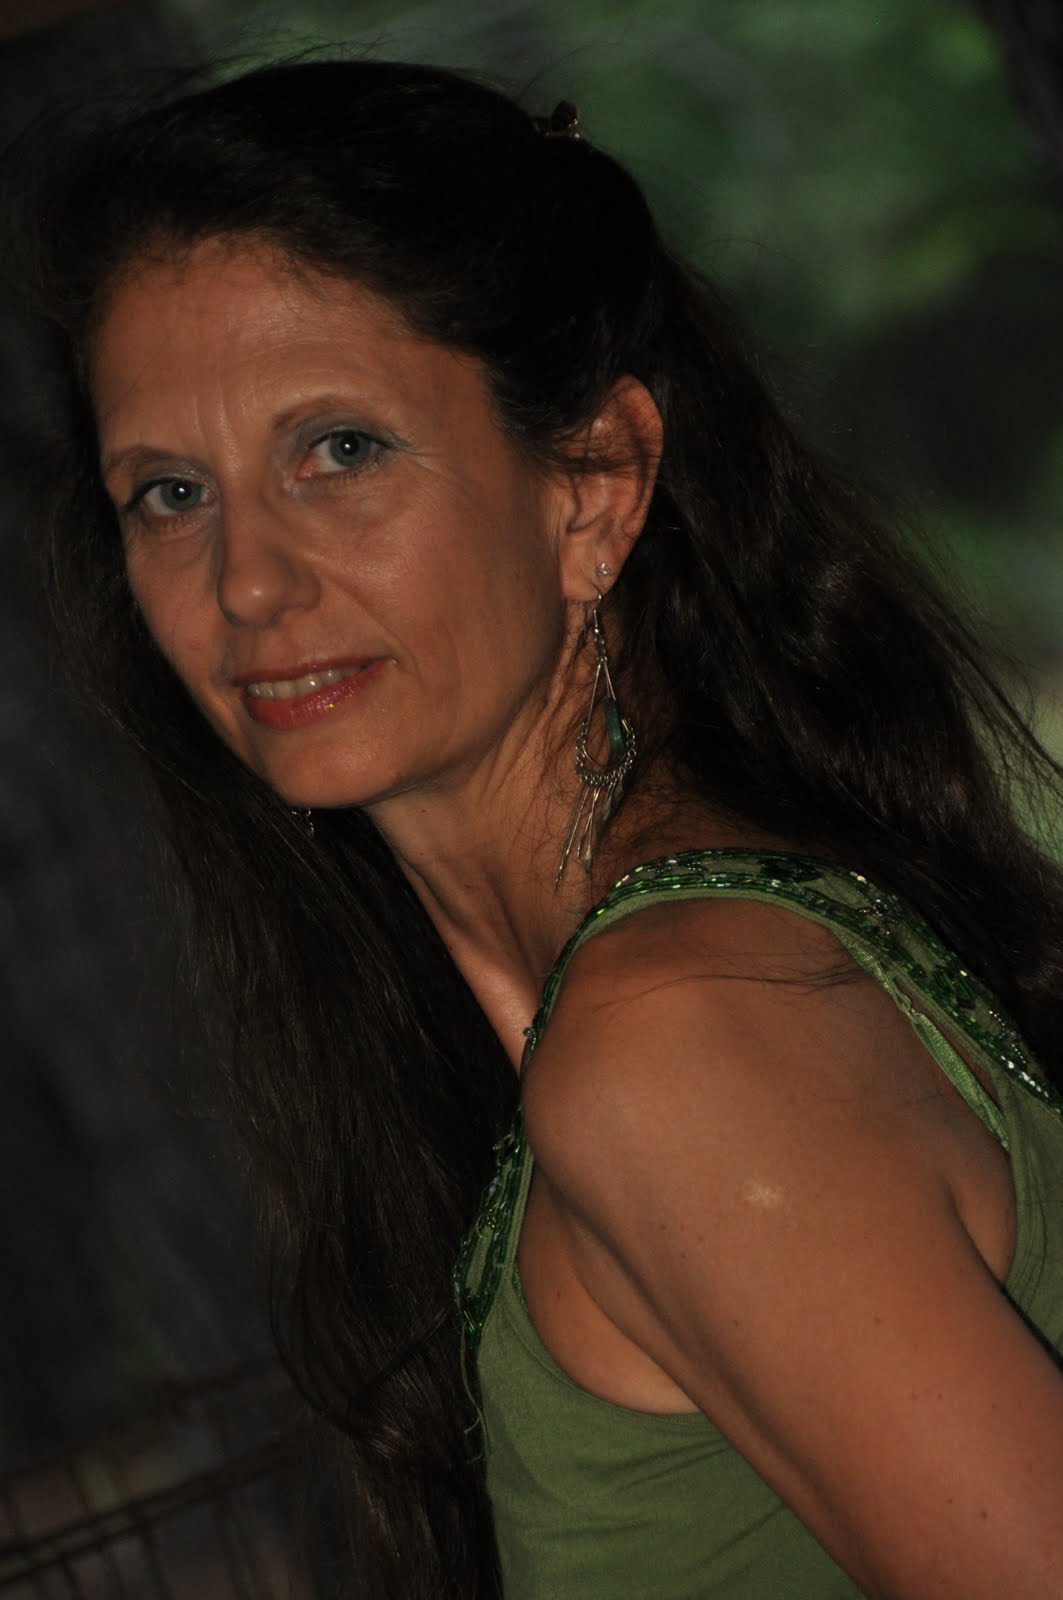
Do you think my hair looks fuller and thicker on top? Or maybe at least you don't notice how flat it actually is.
FYI: My husband did take this photo of me. To be frank, I picked out the location according to the sun and time of day and I told him where to aim. However, there were a LOT of outtakes. Still, you'd think he'd pick on a couple of my tips.
Speaking of tips!
Don't forget my number one tip!
Have FUN!


 |
| I really like this one but he needed a different t-shirt. Darn! |
Wednesday, July 29, 2015
How NOT To Take A Headshot
Let me begin by saying that I am NOT a professional photographer. I'm definitely more of a hobbyist with a purpose.
My first "good" digital camera was a NIKON D50. Then I moved up to a D80, then a D90 and now we have a Nikon d3100 and I have a few extra lens and flashes to go with them.
But I'm not going to bore you with the technical jargon...
I want to cover the basics.
My husband needed a photograph wearing his pilot uniform and because I asked him and my son to set up the backdrop and lighting for me...they decided to stop at the backdrop and do the job themselves.
 To be fair...my 17 year old son doesn't take many photos and my husband wasn't "aware" that the ceiling light in our den would cast such an unflattering lighting across his nose, hair and wrinkles in his shirt.
HOWEVER...
I do want to point out how just a few simple changes made a big difference in the images I took.

First was makeup.
Yes, I put make up on my husband because he had some serious shine going on so I dulled it with powder. I also touched up the eyebrows with a light brown flat eye shadow because his eyebrows, especially the outer half, has a lot of gray and that is just something you can't fix in Photoshop as well as adding a bit of make up.
He suggested I add some to his mostly salty Salt and Pepper hair, but I didn't because I think that's kind of sexy.
POINTERS:

No, seriously, POINTERS:
LIGHTING:
Make sure the lighting is flattering to the subject matter.
I turned off the overhead lighting and opened the blinds. Since my son and husband refused to set up the lighting...I depended on the camera's flash to achieve Phil's headshot.
PLACEMENT:
Don't...I REPEAT...don't stand close to the backdrop (or up against a wall unless that is the look you are going for) because it comes into focus and you loose your depth of field.
CAMERA SETTINGS:
I forgot to check to see which setting they had put the camera on before I started taking the headshots. I would have thought they would have set it on PORTRAITS (I would have) but both their image and my image of Phil was taken on full automatic. Still, you can see a difference.
LENS:
I actually own a portrait lens (don't ask me the technobabble) that is an 85mm 1:18 D that I love using. It just makes everyone look better but you have to get up close and do at least a head and shoulders shot or closer.
FRAMING:
He needed a head and shoulders shot...that's what I took.
TOUCHING UP:
Thank you PHOTOSHOP and all of the other wonderful photo enhancing softwares out there that make us look our best!

I also used the bandaid tool to touch up some blemishes and gave his face a softer (Gaussian Blur) and did a color wash to even out his skin tones. Then I took an eraser and removed the color/blur from his eyes, nose, mouth, and hair.
This is my quick fix trick I add to the headshots I take for our local theater.
However, don't over do it!
I lightened Phil's teeth one shade lighter (Color Enhancements/Color Variation on Photoshop Elements) but when I adjusted the Lighting Levels...the teeth really popped! This was not my intention, but I did several versions and let him pick.


My first "good" digital camera was a NIKON D50. Then I moved up to a D80, then a D90 and now we have a Nikon d3100 and I have a few extra lens and flashes to go with them.
But I'm not going to bore you with the technical jargon...
I want to cover the basics.
My husband needed a photograph wearing his pilot uniform and because I asked him and my son to set up the backdrop and lighting for me...they decided to stop at the backdrop and do the job themselves.

I do want to point out how just a few simple changes made a big difference in the images I took.

First was makeup.
Yes, I put make up on my husband because he had some serious shine going on so I dulled it with powder. I also touched up the eyebrows with a light brown flat eye shadow because his eyebrows, especially the outer half, has a lot of gray and that is just something you can't fix in Photoshop as well as adding a bit of make up.
He suggested I add some to his mostly salty Salt and Pepper hair, but I didn't because I think that's kind of sexy.
POINTERS:
No, seriously, POINTERS:
LIGHTING:
Make sure the lighting is flattering to the subject matter.
I turned off the overhead lighting and opened the blinds. Since my son and husband refused to set up the lighting...I depended on the camera's flash to achieve Phil's headshot.
PLACEMENT:
Don't...I REPEAT...don't stand close to the backdrop (or up against a wall unless that is the look you are going for) because it comes into focus and you loose your depth of field.
CAMERA SETTINGS:
I forgot to check to see which setting they had put the camera on before I started taking the headshots. I would have thought they would have set it on PORTRAITS (I would have) but both their image and my image of Phil was taken on full automatic. Still, you can see a difference.
LENS:
I actually own a portrait lens (don't ask me the technobabble) that is an 85mm 1:18 D that I love using. It just makes everyone look better but you have to get up close and do at least a head and shoulders shot or closer.
FRAMING:
He needed a head and shoulders shot...that's what I took.
TOUCHING UP:
Thank you PHOTOSHOP and all of the other wonderful photo enhancing softwares out there that make us look our best!

I also used the bandaid tool to touch up some blemishes and gave his face a softer (Gaussian Blur) and did a color wash to even out his skin tones. Then I took an eraser and removed the color/blur from his eyes, nose, mouth, and hair.
This is my quick fix trick I add to the headshots I take for our local theater.
However, don't over do it!
I lightened Phil's teeth one shade lighter (Color Enhancements/Color Variation on Photoshop Elements) but when I adjusted the Lighting Levels...the teeth really popped! This was not my intention, but I did several versions and let him pick.
 |
| Basic Touch Up |
 |
| Adjusted Contrast |
 |
| Darker |
Anyway...
The most important thing is to HAVE FUN and take LOTS of photos...you can always delete the bad ones!

This is actually an exercise where you have your subject blow out their cheeks when there smile is getting tense and fake looking. Try it! It really works!
Before you go...please check out the link on the German Shorthair Pointers. Travis and Gus have become and Internet hit with fur baby mom's beautiful photographs of this heartwarming pair.
In memory of Travis.
Monday, June 20, 2011
Accidental Art, Photoshop, and Other Ways to Make You Smile!
Although fun, I don't usually transform someone's photo into a "Glamor Shot" with Photoshop Elements9 but I did find the opportunity to touch up an "oops" image when my subject turned quickly to swoosh her hair and I captured this shot. I though her eyes looked great (which they usually do) SO..... I had a little fun with this "Accidental Art".
My subject had been dancing and developed a bit of a glow in the 95+degree late afternoon Louisiana heat.
This is the image that follows the oops.
I took over 1200 shots in a 4 hour shoot. She had 5 outfit and hair changes.
Below are mores samples with no retouches.


My subject had been dancing and developed a bit of a glow in the 95+degree late afternoon Louisiana heat.
 | |
| original |
 |
| Some touching up. |
 | ||||||
| and a little bit of airbrush work. |
 |
| I added a layer with a FRESCO filter |
Below are mores samples with no retouches.


Friday, June 25, 2010
Well, I'm Embarrassed!
I so wanted this blog to be something I kept up daily, but I admit, it is difficult to find the time to blog, especially since I'm so busy being creative.
I am in the Ruston Community Theatre's summer production "The Dixie Swim Club" by Jessie Jones, Nicholas Hope, and Jamie Wooten which will be performed July 28-August 1. I am sharing the role of Jeri Neal with Linda Griffin who will play the 77 year old character.
 So...
So...
I have been busy learning my lines and rehearsing three evenings a week and upholding my responsibilities as assistant director one night a week. I am also the RCT's headshot and program photographer and that has kept me rather busy making sure all the ladies look their best.
Another creative challenge was to create a photograph featuring the team taken in the early '60's.
It takes more than just cutting and pasting. I have Adobe Photoshop Elements 4.0 on my Dell laptop. I have CS3
 on my iMac but used APE 4.0 because I wanted to just kick back on the sofa with my feet up and watch Leap Year
 (adorable movie!) while working on this photo. Besides...I'm still learning how to use my iMac. This is the original.

 I took several photos of each cast member and matched the characters/actors up accordingly.
The cast photos were in color so I had to remove the color, adjust the size of the face to that of the original photo, brighten and reduce the contrast, then...and this is why our faces merge with that of the original swim teams' face, I altered the transparency of our faces to morph into theirs.
After a little touching up...I believe it made a convincing photo for the poster I will be creating and putting up at the Dixie Center for the Arts Theater in Ruston, LA next week.
But that's another post!
I am in the Ruston Community Theatre's summer production "The Dixie Swim Club" by Jessie Jones, Nicholas Hope, and Jamie Wooten

I have been busy learning my lines and rehearsing three evenings a week and upholding my responsibilities as assistant director one night a week. I am also the RCT's headshot and program photographer and that has kept me rather busy making sure all the ladies look their best.
Another creative challenge was to create a photograph featuring the team taken in the early '60's.
It takes more than just cutting and pasting. I have Adobe Photoshop Elements 4.0


The cast photos were in color so I had to remove the color, adjust the size of the face to that of the original photo, brighten and reduce the contrast, then...and this is why our faces merge with that of the original swim teams' face, I altered the transparency of our faces to morph into theirs.
After a little touching up...I believe it made a convincing photo for the poster I will be creating and putting up at the Dixie Center for the Arts Theater in Ruston, LA next week.
But that's another post!
Sunday, June 13, 2010
Catherine’s Wedding Photos and Other Creative Bridal Gifts
Catherine is a very precious young lady. She is my “daughter by another mother”, my soul sister in dreams and aspirations, and my friend.

 As a teen, she wanted to study sociology and be an archeologist and in her college studies takes classes that keep her connected to her dream. She wants to be a writer and has kept a journal for many years. She plans to travel and this is why, when she told me about her plans to marry, I made her promise she would still do everything she could to live out her dreams. She is only twenty and I want so much for her to have a rich and wonderful life and she told me that her new husband is supportive and willing to let her grow.
 When I tried to find a special gift for her I found anything that she put on her bridal list for her kitchen or apartment were merely material things that would only encumber her when she did have the opportunity to travel.
I decided the best gift was that of my creative self (and the use of my Nikon D90) to take a series of photos that provided a different angle of her wedding day memories and I hope somewhere in the 487 photos I took, many of which will be deleted (those darn blinkers!), she finds a special image that captures her special day that the professional photographer did not.
 Personally, I am very glad I did this. Had I not been walking around annoying people taking “party pix” I would not have met so many of the people who love Catherine as much as I do. I would probably have ended up mingling with those friends and relatives I already knew and listening to my two sons asking when we were going to leave.
The difference between someone with a camera and photographer is that the photographer is not afraid to take dozens of photographs to get that one special look. So, be a PHOTOGRAPHER and take LOTS of photographs and don’t be afraid to delete the bad ones.

And by the way…I did slip some cash in the card I made for her…just in case.

 As a teen, she wanted to study sociology and be an archeologist and in her college studies takes classes that keep her connected to her dream. She wants to be a writer and has kept a journal for many years. She plans to travel and this is why, when she told me about her plans to marry, I made her promise she would still do everything she could to live out her dreams. She is only twenty and I want so much for her to have a rich and wonderful life and she told me that her new husband is supportive and willing to let her grow.
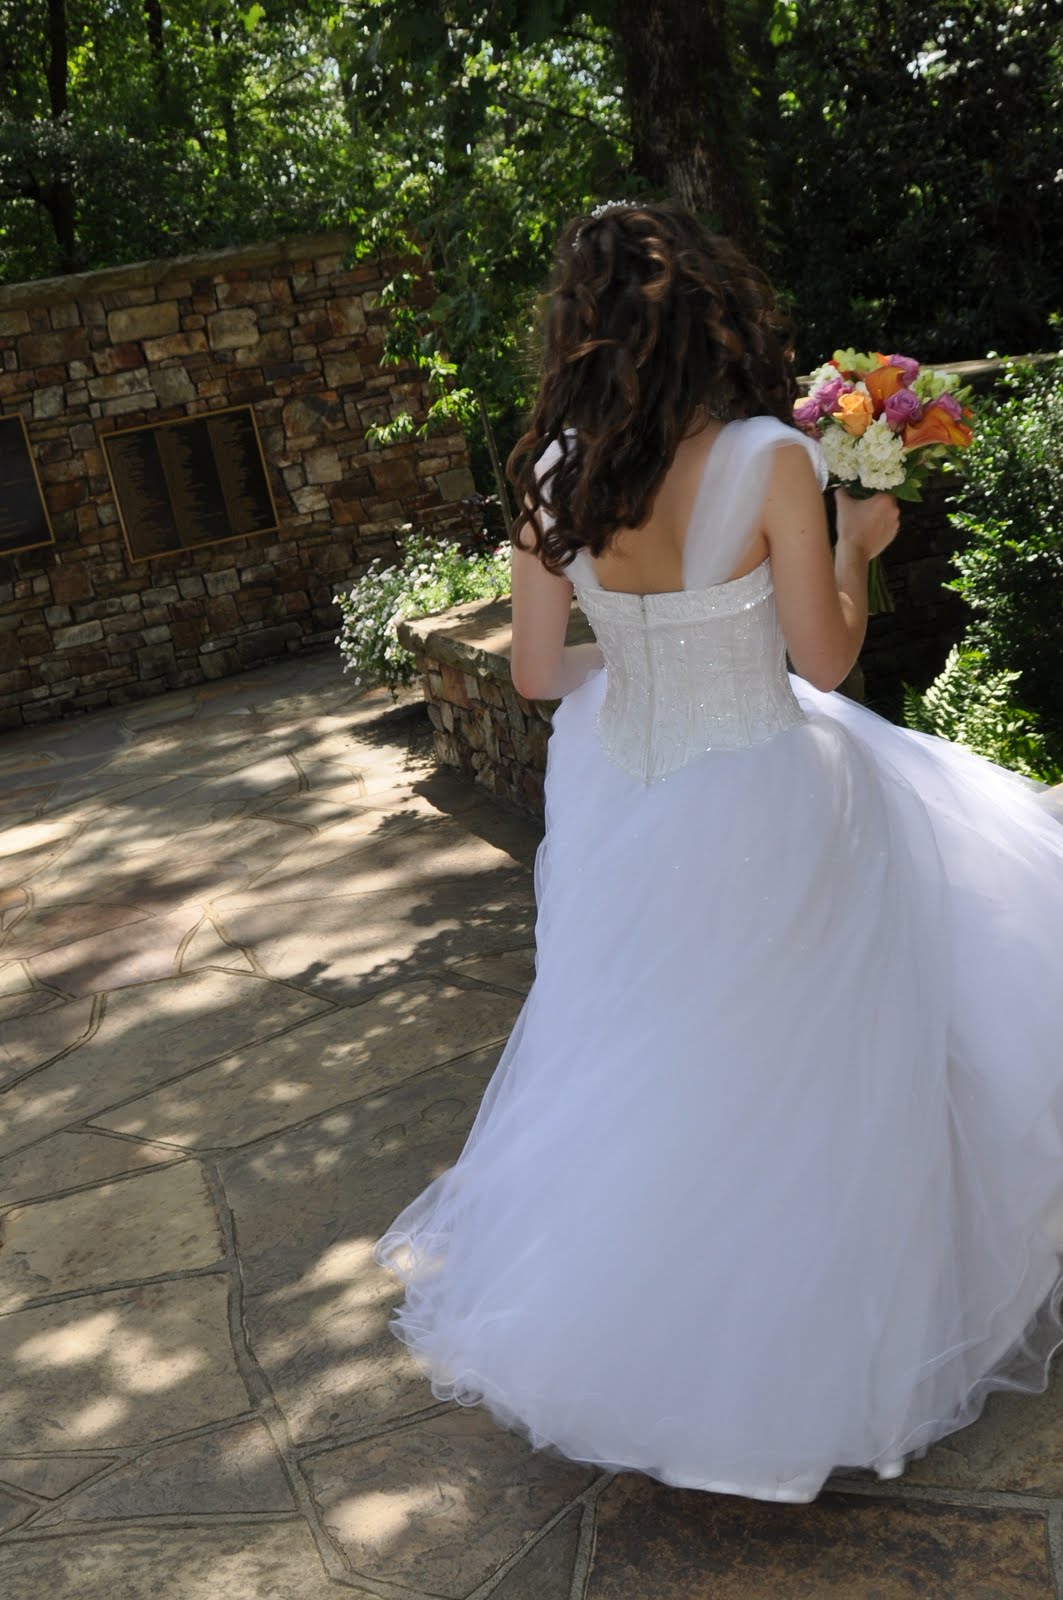
I decided the best gift was that of my creative self (and the use of my Nikon D90) to take a series of photos that provided a different angle of her wedding day memories and I hope somewhere in the 487 photos I took, many of which will be deleted (those darn blinkers!), she finds a special image that captures her special day that the professional photographer did not.

The difference between someone with a camera and photographer is that the photographer is not afraid to take dozens of photographs to get that one special look. So, be a PHOTOGRAPHER and take LOTS of photographs and don’t be afraid to delete the bad ones.

And by the way…I did slip some cash in the card I made for her…just in case.
Subscribe to:
Posts (Atom)